
The Start Workflow task in Zeroplat allows you to trigger a predefined BPM workflow (Business Process Management flow) as part of your event logic. This is typically used when user actions (like submitting a form or clicking a button) should initiate an approval process, request flow, or any workflow defined in your BPM module.
Purpose
- Start an existing workflow (designed and published in Zeroplat BPM).
- Pass data or parameters into the workflow.
- Automate approval flows, business rules, and long-running processes.
- Integrate UI actions (e.g., button click) with back-end business processes.
Anatomy
- Canvas Block
- Shows the Start workflow step in the event flow.
- Can be connected to other tasks (e.g., notifications, close page).
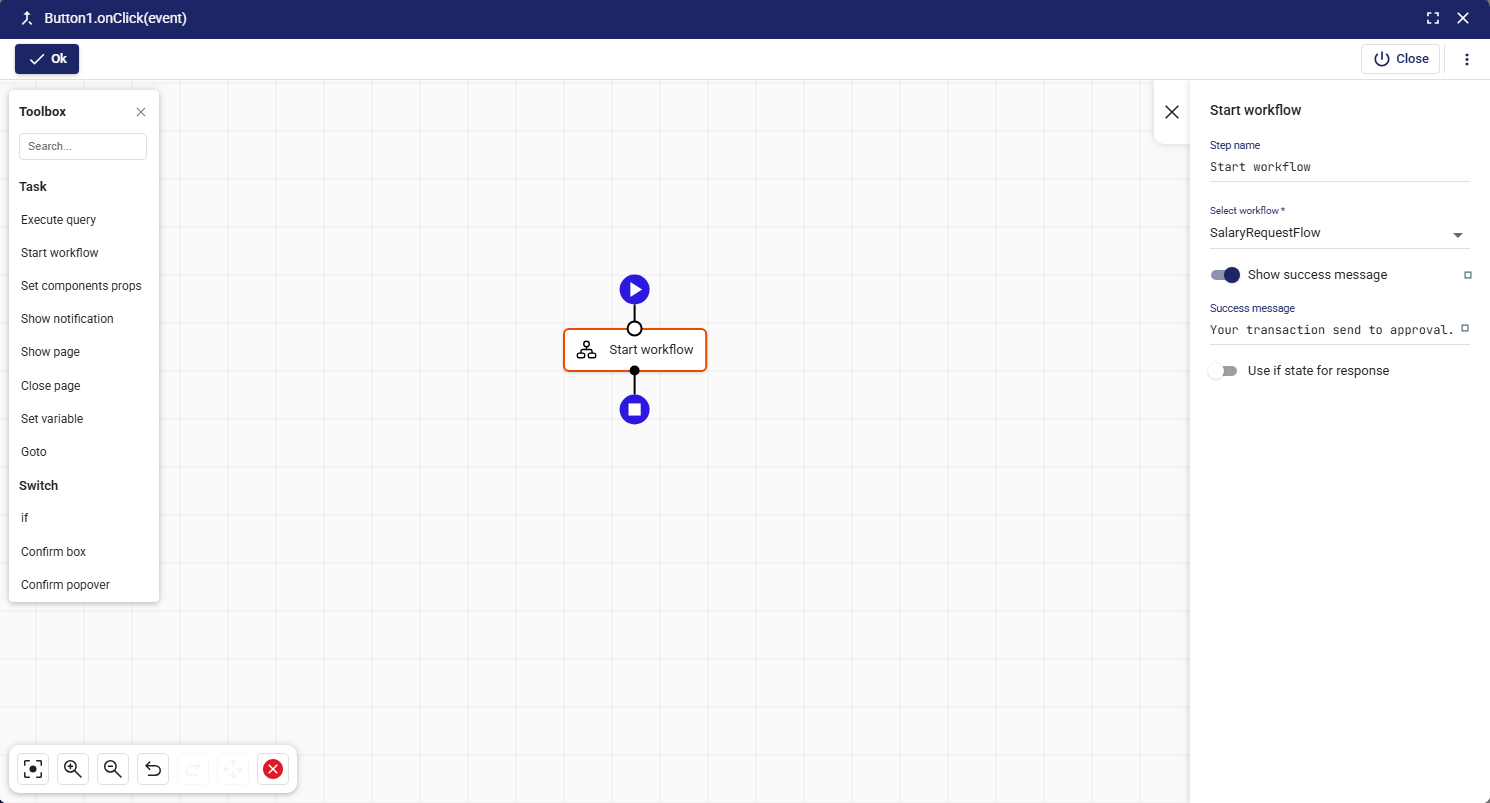
- Properties Panel (right side)
- Step name → Rename the step for clarity (e.g.,
Start Salary Request Flow). - Select workflow → Dropdown listing all available workflows (e.g.,
SalaryRequestFlow). - Show success message → Toggle to display a confirmation toast when workflow starts successfully.
- Success message → Custom message (default: “Your transaction send to approval.”).
- Use if state for response → Enables conditional logic based on workflow response (used for branching).
- Step name → Rename the step for clarity (e.g.,
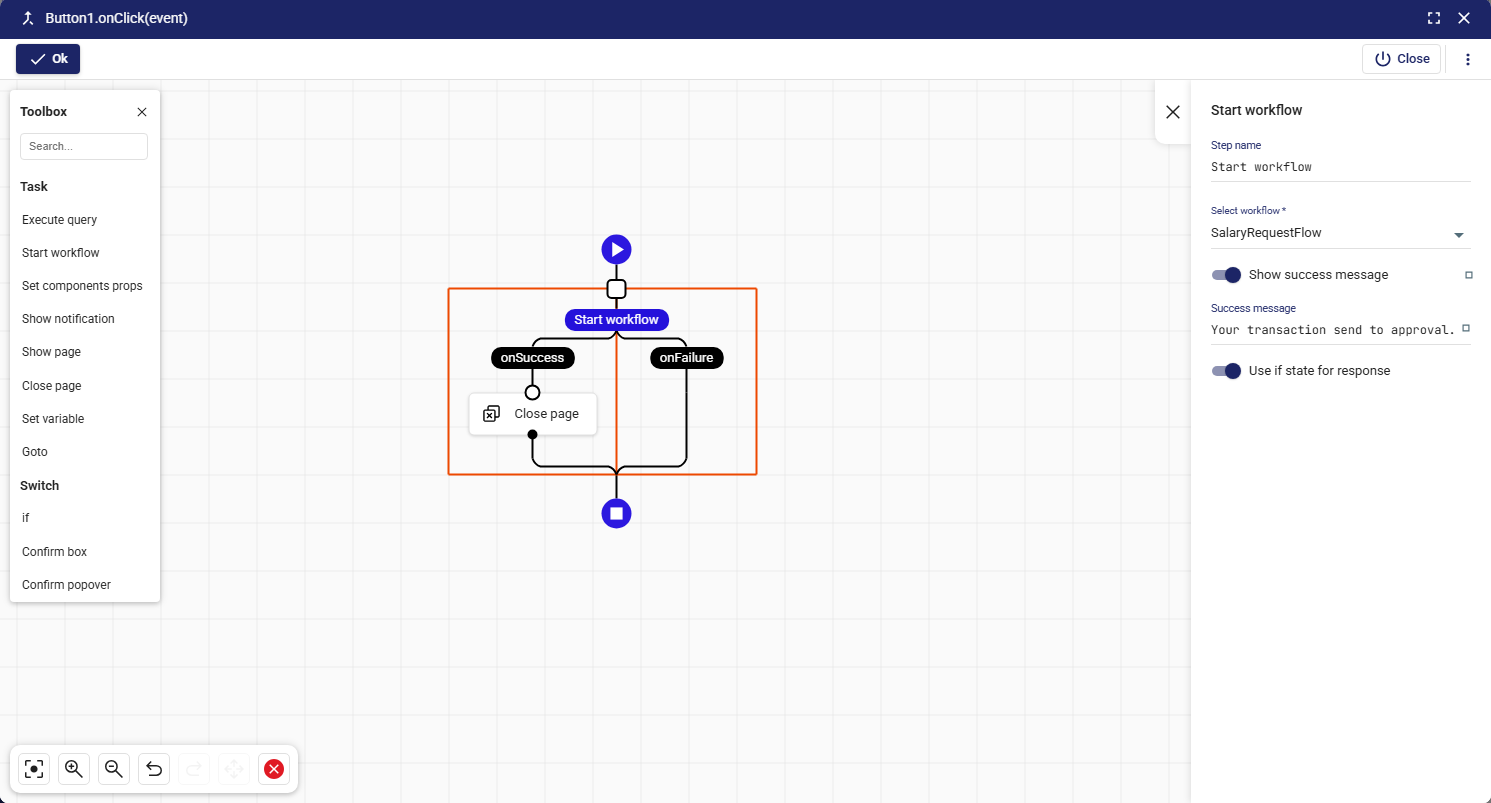
- Flow Connections
- onSuccess → Path taken when the workflow starts successfully.
- onFailure → Path taken when the workflow fails (e.g., due to validation, missing data, or server errors).
How It Works
- Workflow Creation
- Workflows are designed separately in the BPM engine.
- Each workflow has a unique name (e.g.,
SalaryRequestFlow,LeaveApprovalFlow).
- Triggering a Workflow
- In the Event Designer, add the Start Workflow task.
- Select which workflow should be triggered.
- Execution
- When the event is triggered (e.g., a button click), Zeroplat calls the workflow engine to start the selected workflow instance.
- Parameters can be passed (if supported by the workflow design).
- Result Handling
- If the workflow is started successfully → onSuccess path runs.
- If an error occurs → onFailure path runs.
Example 1: Start Salary Request Workflow
- Button → onClick → Start Workflow (
SalaryRequestFlow) → Show notification (“Your salary request has been sent for approval.”)
Properties
- Workflow:
SalaryRequestFlow - Show success message: enabled
- Success message: “Your transaction send to approval.”
Example 2: Workflow with Success & Failure Handling
- Execute:
LeaveApprovalFlow - onSuccess → Close page + Show notification “Request submitted successfully.”
- onFailure → Show notification “Error submitting request.”
Property Reference
Step name
- Optional label for identifying the task.
- Example:
Start Leave Approval Flow.
Select workflow
- Dropdown of available workflows in the BPM engine.
- Must select one to proceed.
Show success message
- Displays a toast on successful workflow initiation.
- Example: “Your request was sent for approval.”
Success message
- Customizable confirmation message.
Use if state for response
- Enables branching logic depending on the workflow’s initial response.
- Useful for workflows that return a status (e.g.,
approvedImmediately,queued,error).
Best Practices
- Always show user feedback (use success/failure notifications).
- Use clear workflow names so non-technical users can understand the process (e.g., “Leave Request Flow”).
- Chain with UI tasks (close modal, reset form, navigate to dashboard).
- Handle errors gracefully using onFailure → Show notification or redirect.
- Use state binding for complex workflows (capture response data into variables for later steps).
Example Use Cases
1. Approval Request
- User clicks Submit Request → Start workflow (
ApprovalFlow) → Notify “Request submitted.”
2. Expense Reporting
- Button → Start workflow (
ExpenseApprovalFlow) - onSuccess → Navigate to
My Requestspage - onFailure → Show error notification
3. Multi-Step User Flow
- Start workflow (
OnboardingFlow) - Save returned workflow instance ID into a variable
- Use it later to poll for progress
AQ
Q: Can workflows accept parameters?
A: Yes. If the workflow is designed to accept input, you can pass variables or component values into it.
Q: What happens if the workflow fails to start?
A: The onFailure path runs, allowing you to show an error or retry.
Q: Does the workflow run immediately or async?
A: Workflow initiation is immediate, but the process itself may be long-running (depending on the BPM design).
Q: What’s the difference between Execute Query vs Start Workflow?
- Execute Query = runs a direct SQL/API/JS query.
- Start Workflow = initiates a BPM process (approval flow, multi-step business logic).
👉 In summary: Start Workflow is the bridge between user interactions and Zeroplat’s BPM engine. It lets you trigger complex approval or process flows from UI actions, with full support for success/failure handling and user feedback.