
Zeroplat provides multi-language support, allowing applications to be fully localized for different tenants. Each tenant can define and manage its own set of languages independently, ensuring that multi-tenancy is preserved with flexible language configurations.
Key Features of Languages
- Dynamic Language Management
- From the Languages screen, administrators can add, enable/disable, or set default languages dynamically.
- Each tenant maintains its own language list, meaning different tenants can support different sets of languages.
- Menu & Data Localization
- Both menus (UI elements) and data values support multi-language translations.
- Data is stored in the database in a JSON-like localized format, for example:
{ "tr": "merhaba", "en": "hello" } - This ensures that users always see data in their selected language.
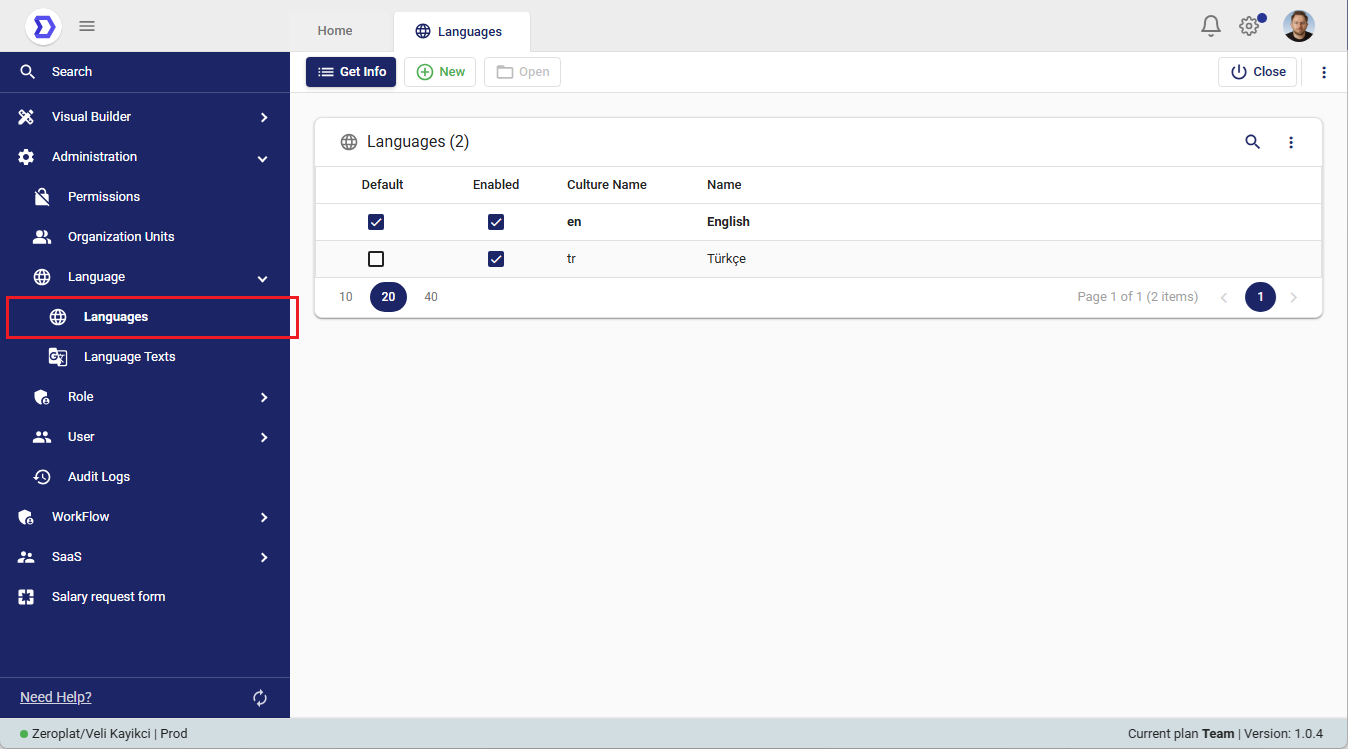
- Default and Enabled Languages
- Default: Defines the primary language for the tenant.
- Enabled: Indicates which languages are active and can be used across the application.
Localized Input Component
To manage localized data inputs, Zeroplat uses the LocalizedInput component.
- When creating or editing multilingual content, the LocalizedInput provides an input field for each enabled language.
- Example: If a tenant has Turkish (tr) and English (en) enabled, the LocalizedInput will show two inputs, allowing values for both.
- This ensures consistency and makes it easy to provide translations directly during data entry.
Practical Example
- A tenant enables Turkish and English in the Languages screen.
- A form field like Welcome Message is created with a LocalizedInput.
- The admin enters:
- Turkish: “Merhaba”
- English: “Hello”
- In the database, the value is stored as:
{ "tr": "Merhaba", "en": "Hello" } - When users log in with Turkish UI, they see “Merhaba”. With English UI, they see “Hello”.
Benefits
- Multi-tenant aware: Each tenant can have its own languages.
- Dynamic: Administrators can enable/disable or add new languages anytime.
- Consistent data structure: JSON-based multilingual values simplify integration and querying.
- User-friendly: LocalizedInput ensures that translations are collected directly at data entry.
📌 Summary:
The Languages screen in Zeroplat provides a central way to manage multi-language support per tenant. By using LocalizedInput and database-backed JSON values, the platform ensures that both UI menus and data are dynamically localized according to the tenant’s configured languages.
Adding a New Language
Zeroplat allows administrators to dynamically add new languages to each tenant. This ensures that multi-language support can be expanded as needed, without requiring system-level changes.
Steps to Add a New Language
- Click “New”
- Navigate to the Languages page.
- Click the New button to open the Language Entry form.
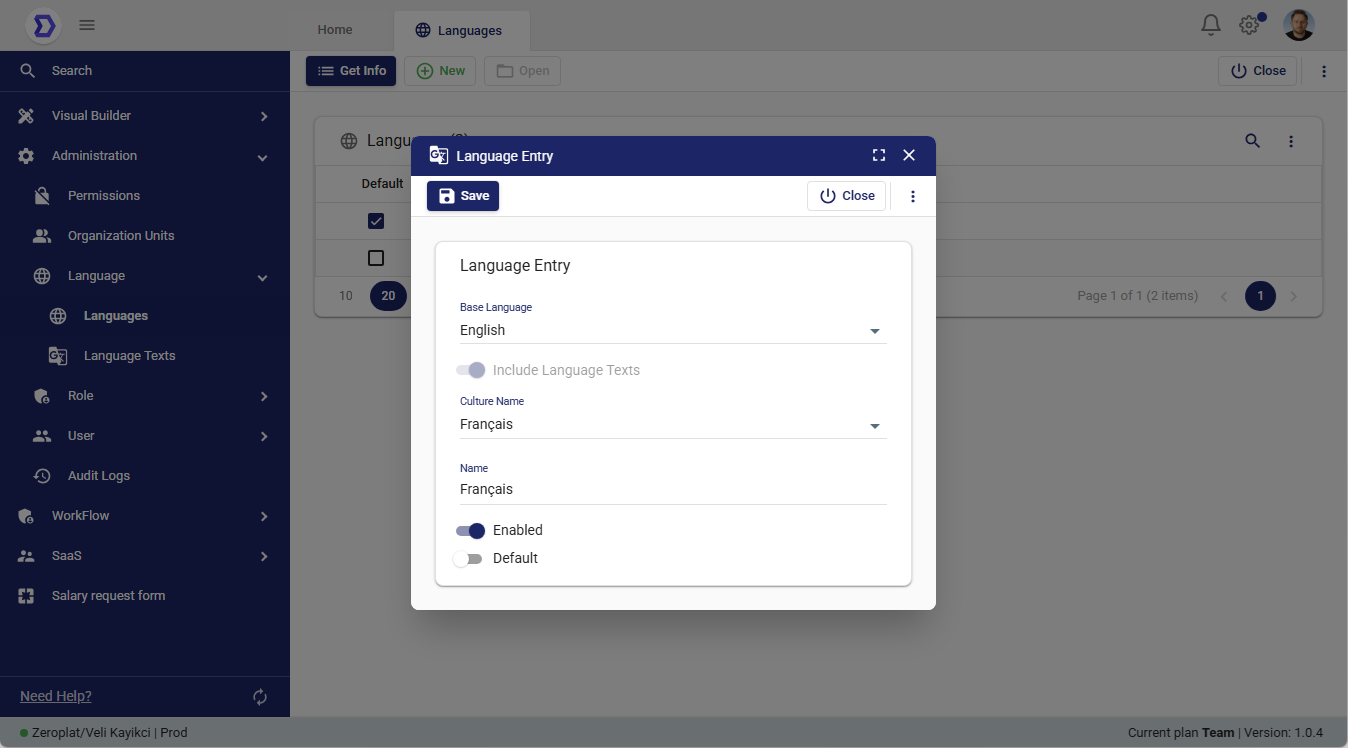
- Fill in the Language Entry Form (first screenshot)
- Base Language: Select an existing base language (e.g., English).
- This is important because new language definitions will initially reference the base language structure.
- Culture Name: Choose the culture code/name (e.g., Français for French, tr for Turkish).
- Name: Enter the display name of the language (e.g., Français).
- Enabled: Check this to make the language active.
- Default: Optionally, set this language as the tenant’s default language.
- Base Language: Select an existing base language (e.g., English).
- Save the Language
- Click Save to create the new language.
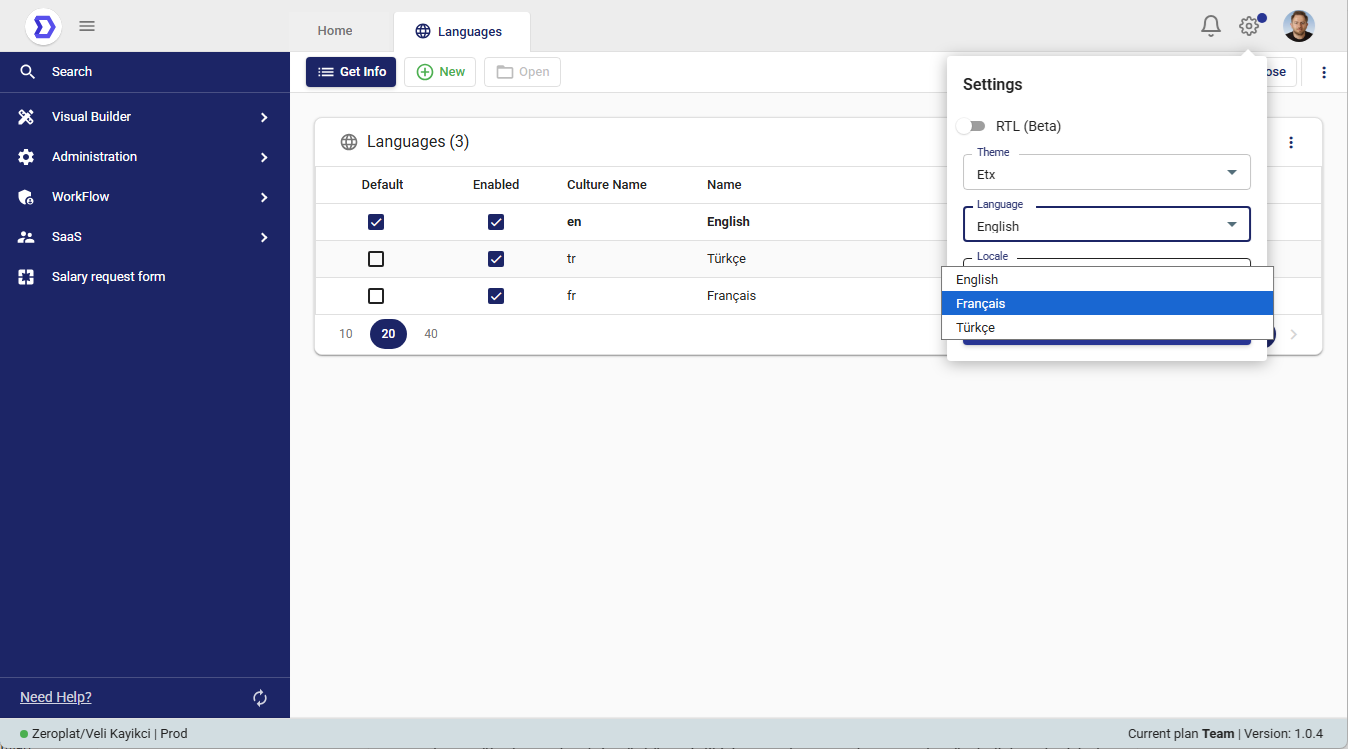
- The language will now appear in the Languages list.
Important Notes
- Base Language Dependency
When you add a new language, Zeroplat uses the base language as a template.
However, newly added languages will not have translations defined yet. - Empty Menus and Labels
After adding a new language, menus and UI labels will appear empty for that language until translations are provided.- Example: Adding French will result in blank menu items until French texts are defined.
- Defining Translations
To fix empty menus, go to the Language Texts section and provide translations for all required keys.- Example:
"Dashboard"→"Tableau de bord"for French.
- Example:

Example Scenario
- Add French as a new language.
- Set English as the base language.
- Save and enable French.
- Switch application language to French → Menus appear but text fields are empty.
- Define translations in Language Texts.
- After translations are entered, all menus and data dynamically appear in French.
📌 Summary:
Adding a new language in Zeroplat is simple: choose a base language, set culture and name, then save. But remember — until translations are defined in Language Texts, the menus and labels will appear empty. This design ensures flexibility, letting each tenant fully customize their own multi-language content.