Creating a Salary Request Form for Workflow
In this section, we will demonstrate how to create a form that will be used inside a workflow process. As an example, we will build a Salary Request Form that employees can submit for approval.
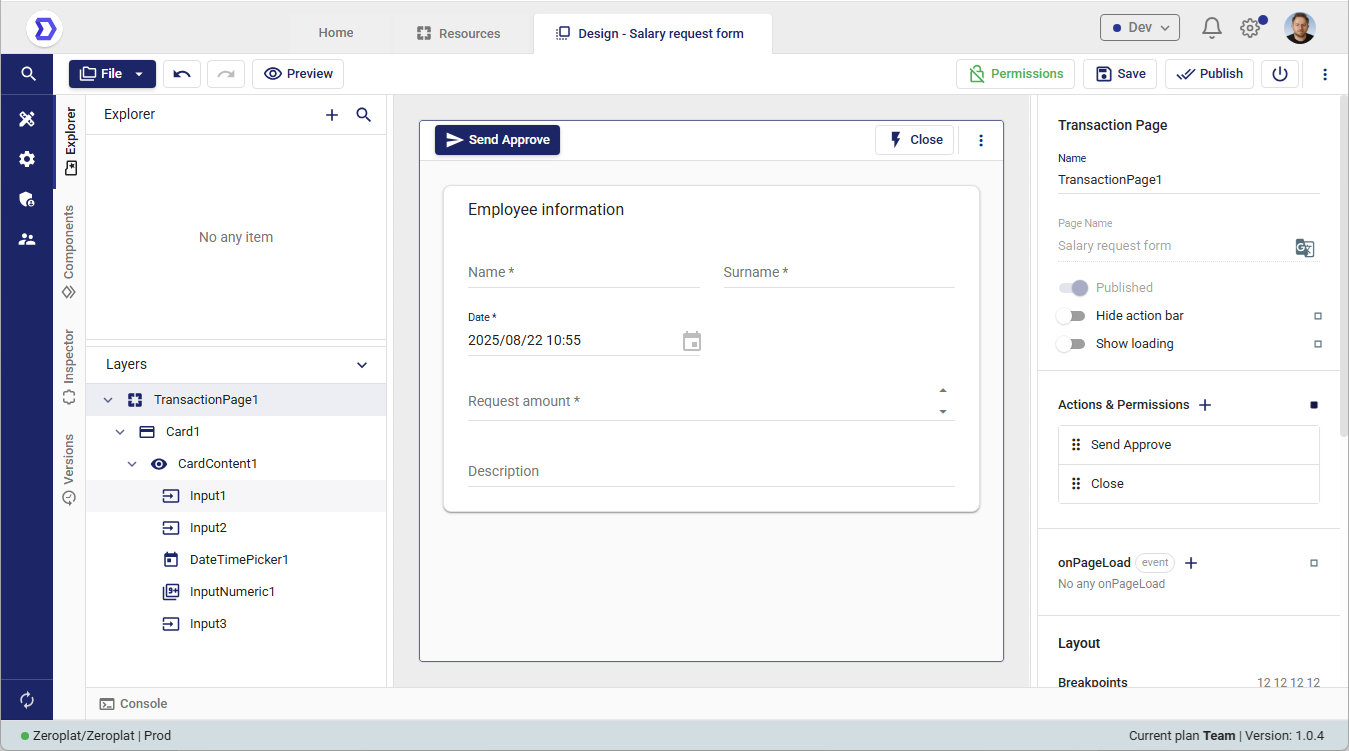
Step 1: Creating the Form
- Navigate to the Form Designer in Zeroplat.
- Create a new Page and set its Page Name to:
Salary request form. - Inside the page, add the following components:
- Input fields for Name and Surname
- Date picker for selecting the request date
- Numeric input for the Request amount
- Multiline text area for Description
These fields will allow the employee to fill in all the necessary details for a salary request.
Creating a New Flow
Workflows (Flows) in Zeroplat allow you to design and automate business processes directly inside your applications. This section explains how to create a new Flow from scratch.
Steps to Create a Flow
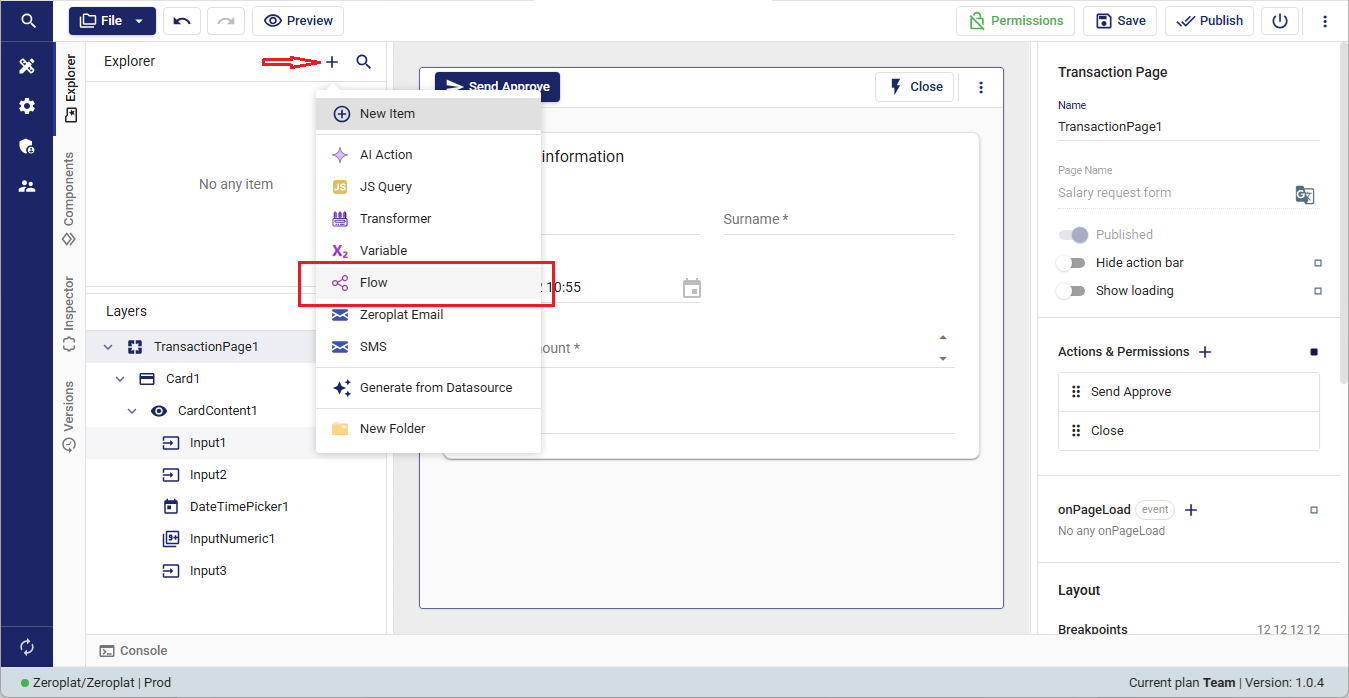
- Open the Explorer Panel
Navigate to the Explorer panel on the left side of the interface. This panel lets you manage all elements of your application, such as pages, components, queries, and workflows. - Add a New Item (+)
At the top of the Explorer panel, click the “+” icon to add a new item. - Select Flow
From the dropdown menu, you will see different options like AI Action, JS Query, Transformer, Variable, etc.
Choose “Flow” to create a new workflow.
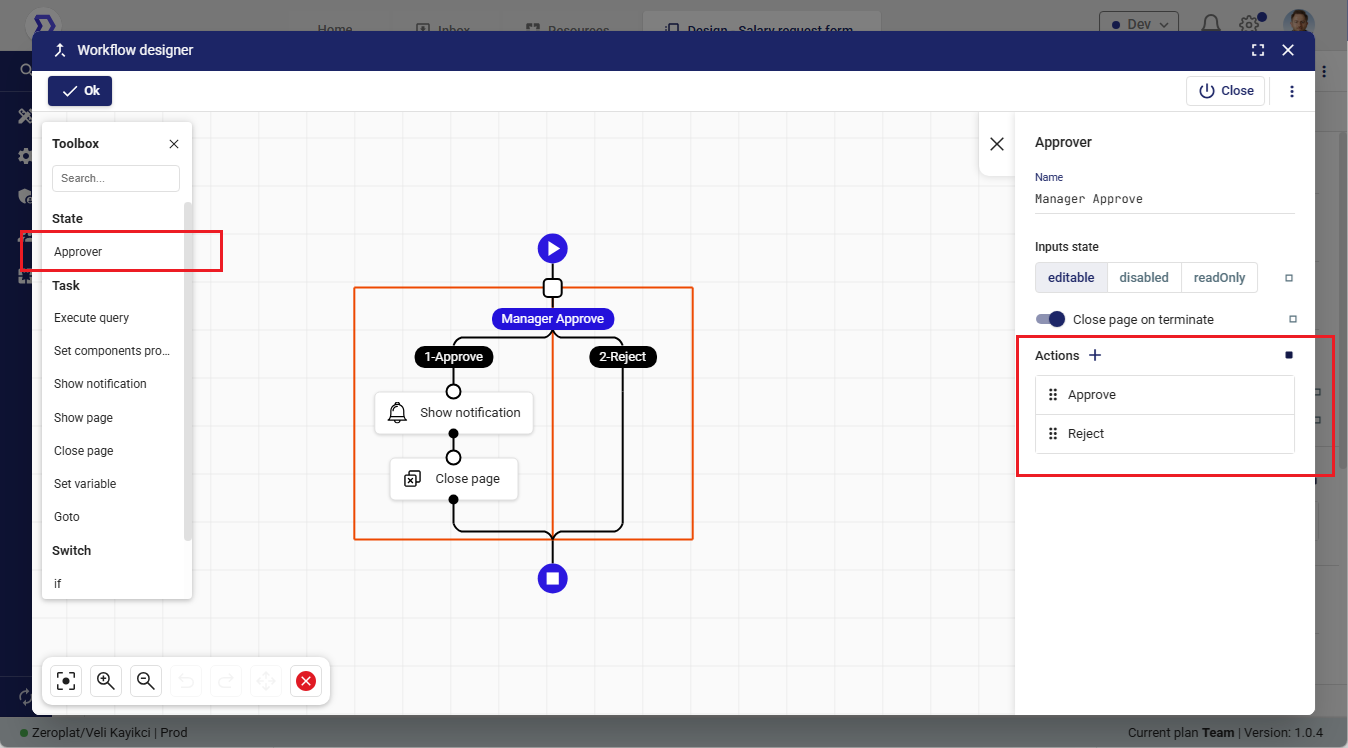
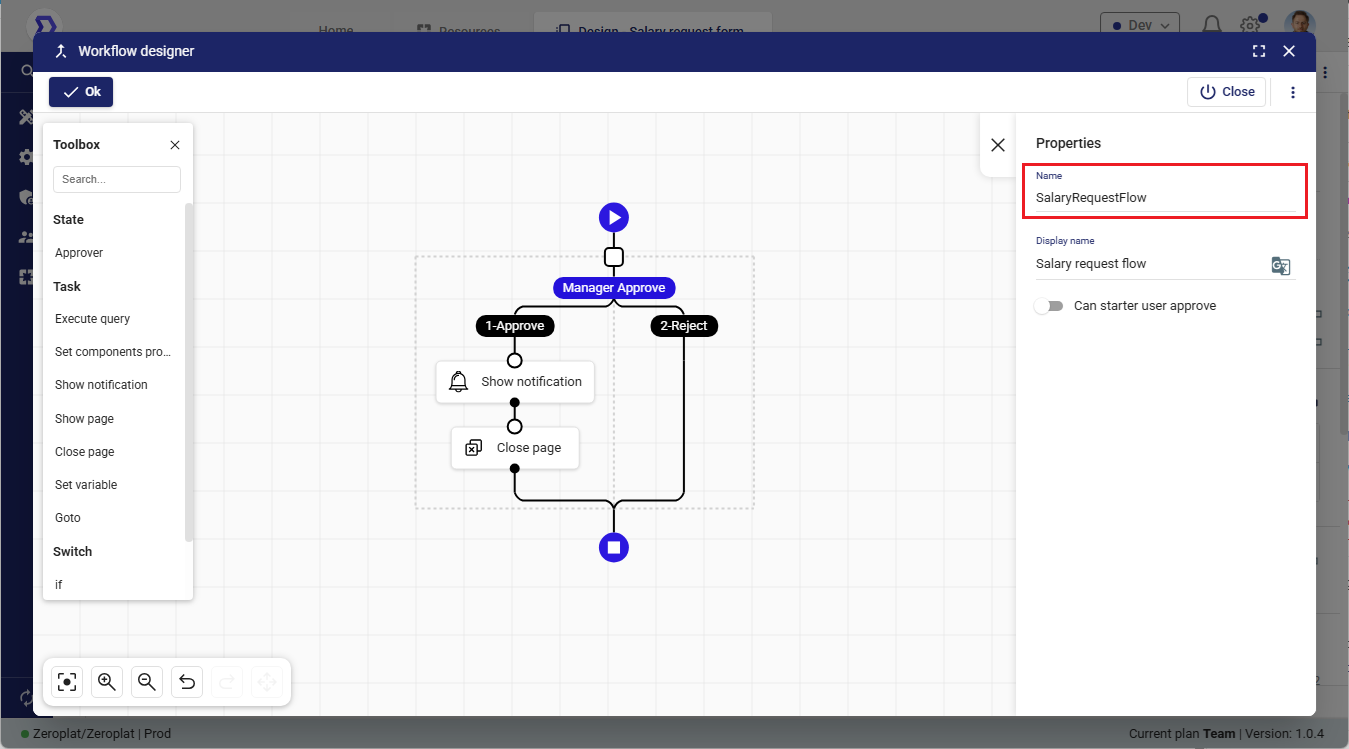
In the Workflow Designer, you add an Approver state. Each Approver state represents a step where one or more users must decide (e.g., Manager Approve).
In the right-hand panel, you can configure: The name of the step (Manager Approve). Actions that are available (e.g., Approve, Reject).
These actions (Approve, Reject) are linked with the Permissions screen. Only users, roles, or organizational units granted permission for these actions will see the workflow item in their Inbox. Example: If the Admin role is assigned to Manager Approve → Approve/Reject, then only Admin users will see and act on the item.
4. Name Your Flow
Enter a descriptive name for the Flow (e.g., SalaryApprovalFlow, UserOnboardingFlow).
Choosing meaningful names helps you identify and manage your workflows more easily in the future.
Using a Flow in Your Page
Once you create a Flow, you can connect it to buttons, events, or other UI actions. This way, when users interact with the page, the Flow will be executed.
Example: Triggering a Flow with Page Action
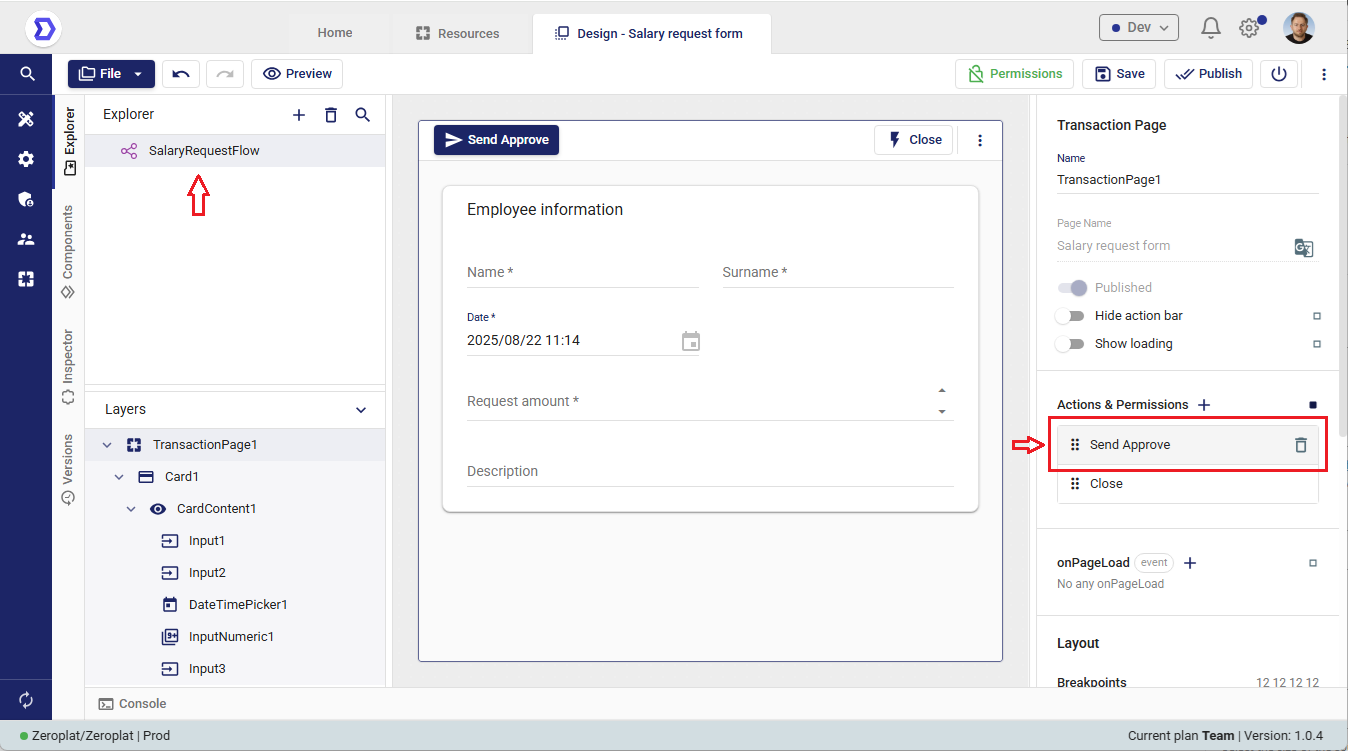
In the screenshot, we have a form called “Salary request form”. There is a button named “Send Approve”, which should start the SalaryRequestFlow when clicked.
Steps
- Open the Page Properties
Select the page or component where you want to trigger the Flow. In this case, the Transaction Page with the Send Approve button is selected. - Locate Actions & Permissions
On the right-hand panel, find the Actions & Permissions section.
This is where you can define what should happen when a user clicks a button, submits a form, or performs another action. - Add a New Action
Click the “+” icon inside Actions & Permissions and choose the event you want to bind the Flow to (e.g., Button Click). - Select Your Flow
From the available options, choose the Flow you previously created (in this case:SalaryRequestFlow). - Save
Once connected, every time a user clicks Send Approve, the SalaryRequestFlow will start automatically.
Step: Using the Created Workflow
In this step, we link the workflow we previously designed (in this case, SalaryRequestFlow) to an event so that it can be executed when triggered.
What You See in the Image
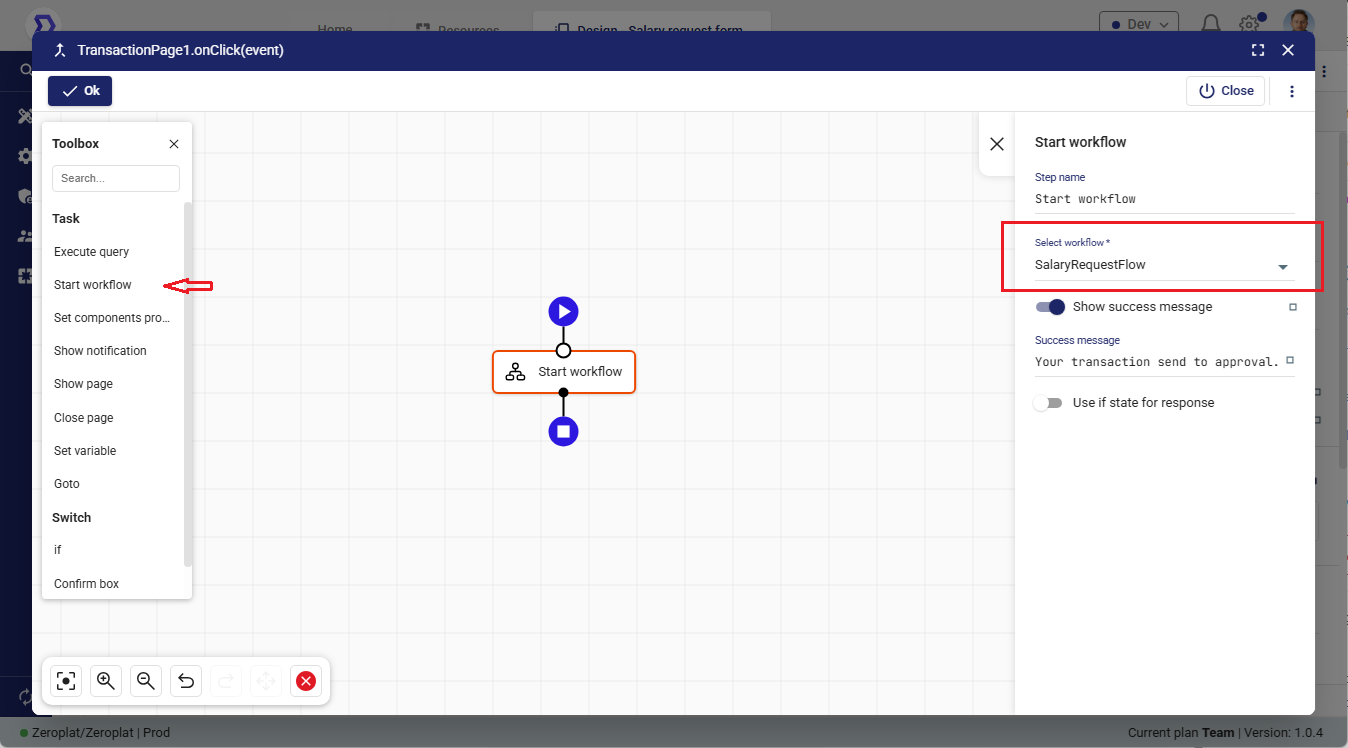
- Toolbox (left panel): From the task list, the option “Start workflow” is selected. This allows you to initiate any of your defined workflows when a certain event occurs (e.g., a button click).
- Workflow node (center): The block labeled Start workflow is placed on the canvas, representing the execution of a workflow.
- Configuration panel (right panel):
- Select workflow: Here, the SalaryRequestFlow is chosen from the dropdown list. This means whenever this node is triggered, the Salary Request workflow will begin.
- Success message: You can define a confirmation message (e.g., “Your transaction send to approval.”) which will be displayed when the workflow starts successfully.
- Additional toggles (e.g., Use if state for response) allow more advanced handling of responses.
Explanation
By selecting a workflow in this panel, you are essentially connecting your application logic with your business process flow. This ensures that when users interact with the UI (such as clicking a button), the defined workflow (like requesting a salary approval) is launched automatically.
📌 Tip: Always ensure you select the correct workflow from the dropdown. This makes the action reusable and keeps your workflows consistent across different pages and triggers.
Step: Opening and Using the Created Form
Now that the workflow has been prepared and connected, the next step is to use the screen we created.
What You See in the Image
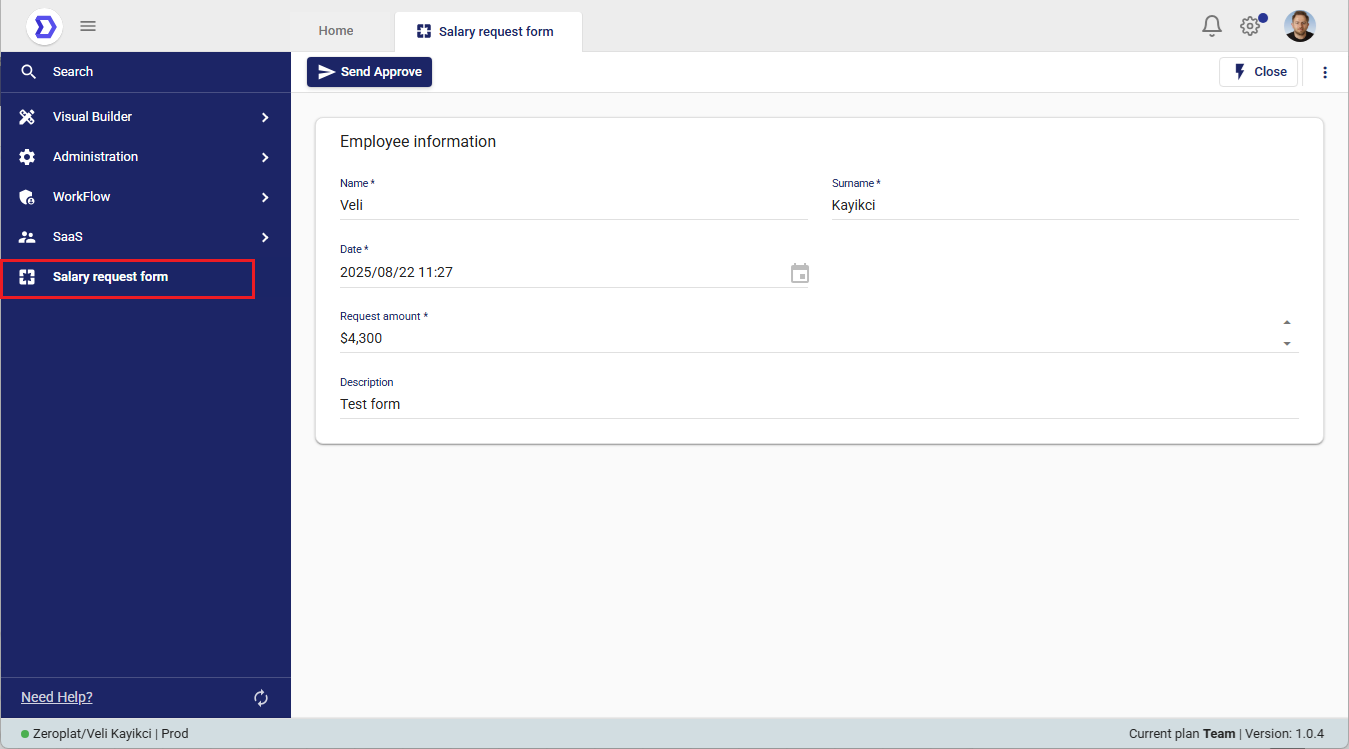
- Navigation Menu (left panel): The new entry Salary request form has appeared in the menu. This is the form we previously created and linked to our workflow.
- Form Screen (main panel):
- Employee information fields:
- Name / Surname – Identifies the employee making the request.
- Date – Automatically filled with the current timestamp.
- Request amount – The salary request amount entered by the user (here: $4,300).
- Description – Additional details (here: “Test form”).
- Employee information fields:
- Action Button (top bar): The “Send Approve” button triggers the workflow (SalaryRequestFlow) that we previously connected.
Explanation
At this stage, users interact directly with the form we designed. By navigating to the left panel and selecting Salary request form, the employee can input the required details. Once the Send Approve button is clicked, the form data is passed to the workflow, automatically starting the approval process.
This confirms the full cycle:
- Form design →
- Workflow preparation →
- Binding workflow to the action →
- Using the form in the live application.
📌 Tip: You can create similar forms for different processes (e.g., leave requests, expense claims) and connect each to its corresponding workflow, making your business flows fully automated.
Step: Sending the Request for Approval
Once the employee fills in the Salary Request Form and clicks the Send Approve button, the workflow is triggered and the approval process begins.
What You See in the Image
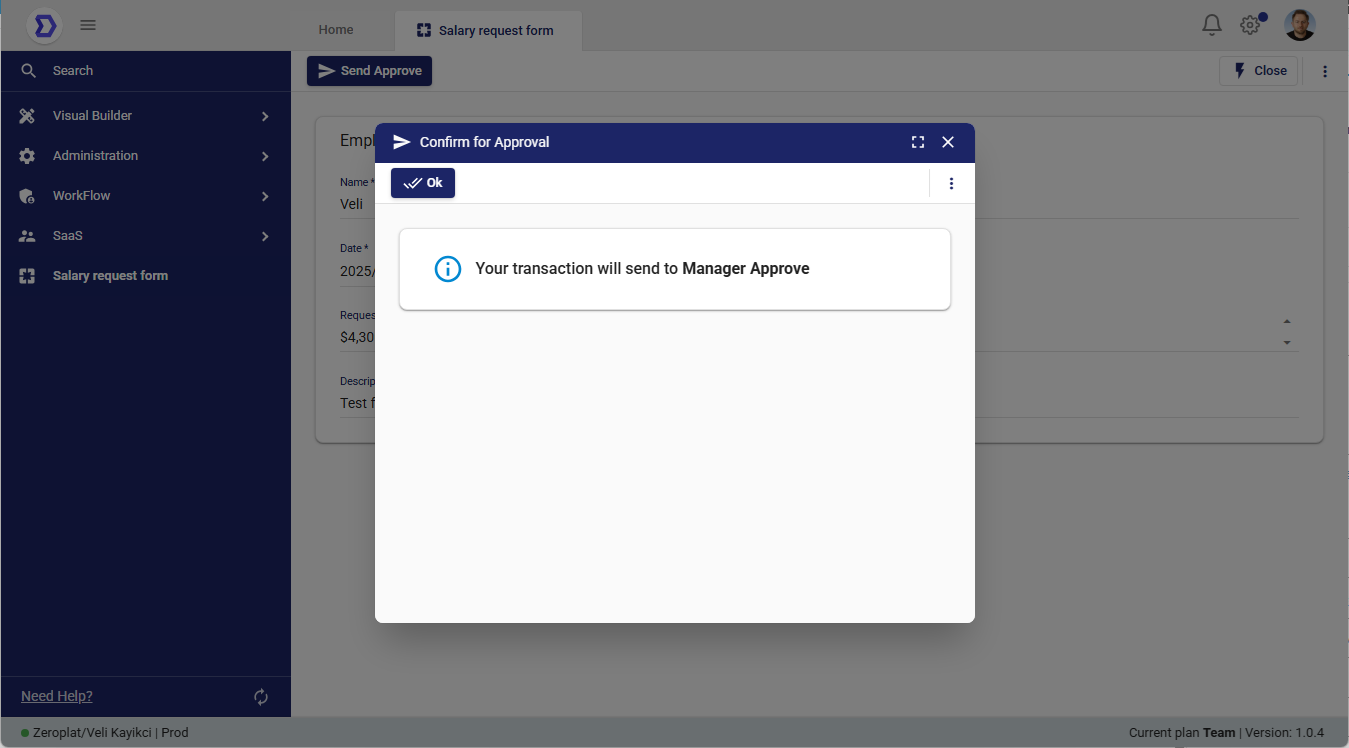
- Confirmation Modal (center):
- Title: Confirm for Approval
- Message: “Your transaction will send to Manager Approve”
- Ok Button: Confirms the action and sends the request into the workflow.
Explanation
At this stage, the system validates the action and informs the user that their request is being forwarded for manager approval. This is the first approval step in the workflow we previously linked (SalaryRequestFlow).
By confirming this dialog:
- The request is submitted.
- The workflow continues automatically to the next stage — in this case, Manager Approve.
- The user receives feedback so they know their request is being processed.
📌 Tip: Adding clear success messages helps users understand exactly what is happening in the background. This reduces uncertainty and improves the overall user experience.
Step: Checking Pending Approvals in the Inbox
After submitting the request, the next step is to check whether any approval tasks are waiting for the user (in this case, the manager) in their Inbox.
What You See in the Image
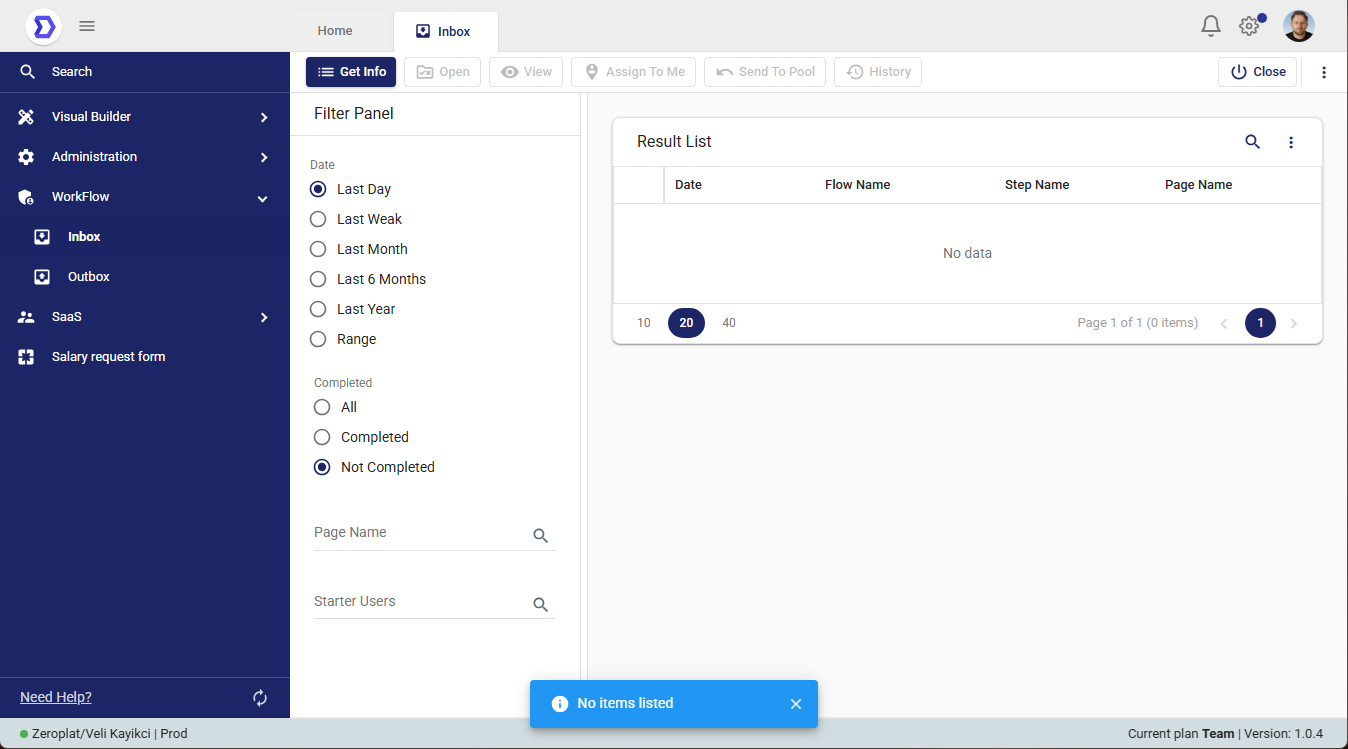
- Navigation Menu (left panel): The Inbox section is selected under WorkFlow.
- Filter Panel (left side of the screen): Provides options to filter tasks by:
- Date: Last Day, Last Week, Last Month, Last 6 Months, Last Year, or a custom range.
- Completion Status: All, Completed, or Not Completed.
- Additional filters for Page Name and Starter Users.
- Result List (main panel): Displays all workflow tasks assigned to the user. In this example, there are currently no pending items.
Explanation
The Inbox acts as a task center for workflow approvals. Whenever a workflow step (e.g., Manager Approval) requires user action, the item will appear here. From this screen, the user can:
- Open the task to review details.
- Approve or reject requests.
- Track workflow progress and history.
In the screenshot above, the inbox is empty (“No data”), meaning there are no tasks waiting for approval at this moment.
📌 Tip: Always check the Inbox to monitor if there are pending approval tasks. If a request does not appear, verify that:
Step: Configuring Approval Permissions
Before a workflow can proceed to the approval stage, it is necessary to define who is authorized to approve or reject the request. This ensures the right users or groups are responsible for handling approvals.
What You See in the Image
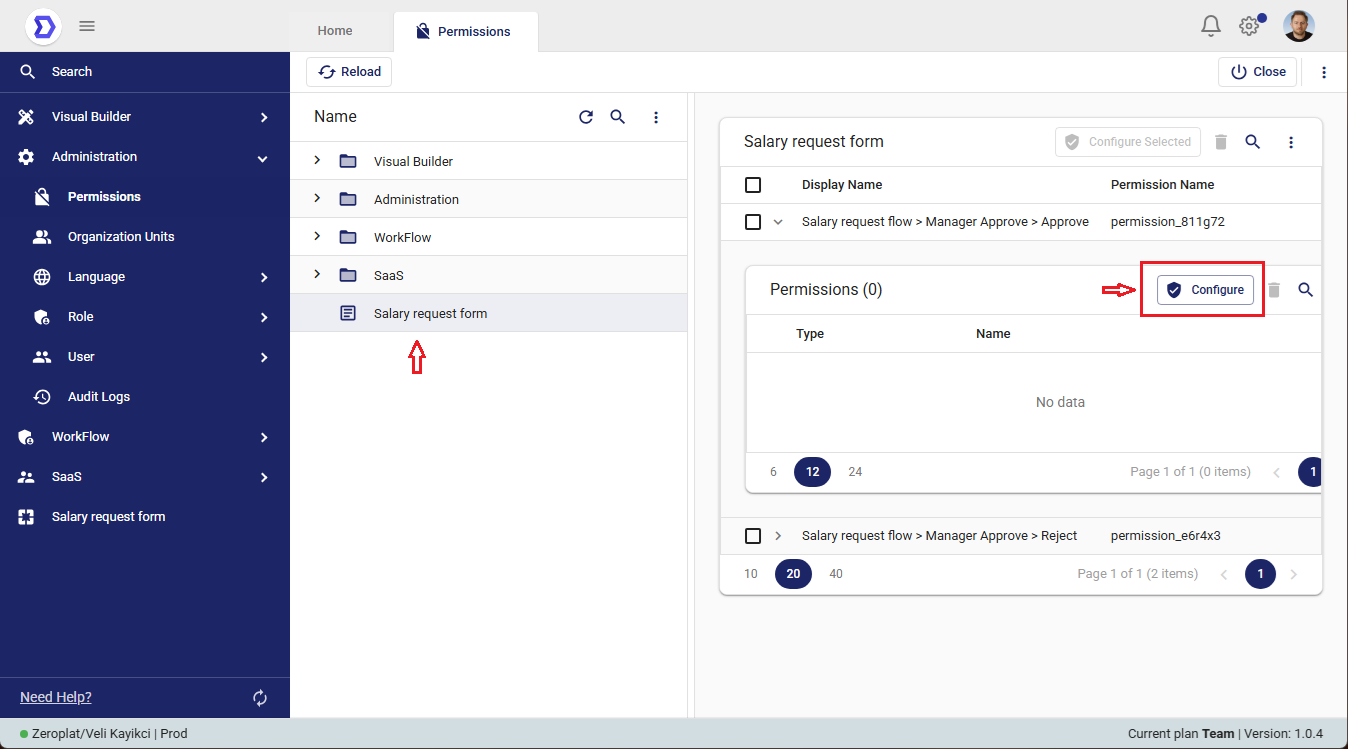
- Navigation Menu (left panel): The Permissions section is open, and under it, the Salary request form has been selected.
- Permission Entries (right panel):
- Salary request flow → Manager Approve → Approve
- Salary request flow → Manager Approve → Reject
- Configure Button: Opens a configuration dialog where you can assign the permission to specific roles, users, or organizational units.
Explanation
From this screen, you can define which roles or individuals are responsible for handling the approval. For the example shown:
- The Manager Approve step of the SalaryRequestFlow has two actions: Approve and Reject.
- By clicking Configure, you can assign these permissions to roles (e.g., Admin, Manager), individual users, or entire organizational units.
- In this case, the approval rights are granted to users with the Admin role, meaning only administrators can approve or reject salary requests.
This configuration ensures that approval workflows follow the correct authorization structure in your organization.
📌 Tip: Always align permissions with your company’s hierarchy. For example:
- Line Managers for expense approvals.
- Finance Department for payment requests.
- Admin Role for system-level or critical flows.
Step: Selecting Who Can Approve
After opening the Configure dialog for the workflow permissions, the system allows you to specify exactly which roles, users, or organization units are authorized to approve or reject the request.
What You See in the Image
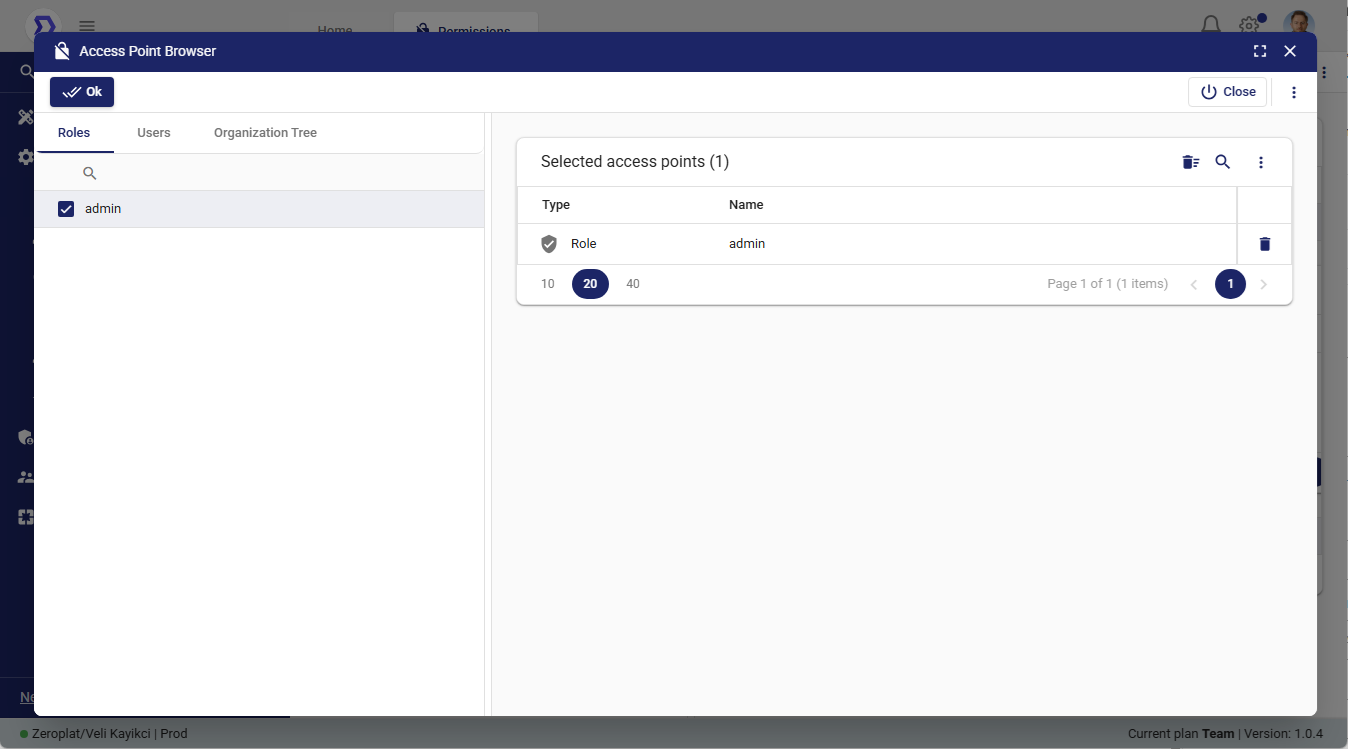
- Tabs (left side): Options to select from:
- Roles – Assign approval to user roles (e.g., Admin, Manager).
- Users – Assign approval to specific individual accounts.
- Organization Tree – Assign approval to entire departments or organizational groups.
- Selected Access Points (right side): Shows which role, user, or group has been granted approval rights. In this example, the Admin role has been selected.
Explanation
From this screen, you can fine-tune who is responsible for handling the approval process:
- If Roles is selected, everyone with that role (e.g., Admin) will have approval rights.
- If Users is selected, only the chosen individuals can approve or reject requests.
- If Organization Tree is used, entire units (like Finance Department or HR) can be assigned as approvers.
In this example, the Admin role is assigned, meaning that anyone with administrative privileges will see and be able to act on approval tasks.
📌 Tip: For flexible workflows, combine multiple levels (e.g., a role + a specific user) to ensure there’s always a backup approver.
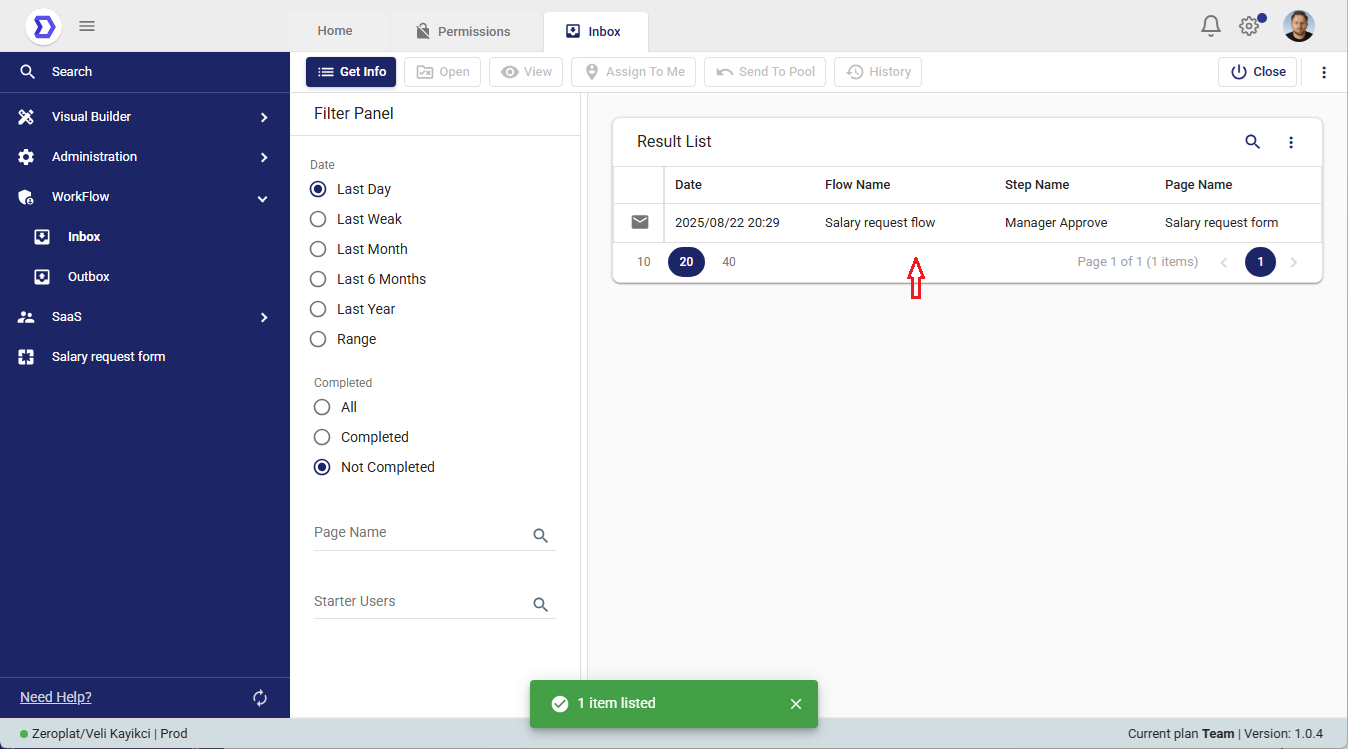
Step: Viewing Pending Approvals as an Admin
Since we previously configured the workflow permissions to allow only Admin role users to approve or reject requests, the current user (logged in with the Admin role) is able to see the pending item in the Inbox. If the user did not have the Admin role, this approval task would not appear in their Inbox.
What You See in the Image
- Filter Panel (left):
- Date filter is set to Last Day, so only recent requests are shown.
- Completion filter is set to Not Completed, ensuring only active tasks are listed.
- Result List (right): Displays the pending approval request with the following details:
- Date: 2025/08/22 20:29
- Flow Name: Salary request flow
- Step Name: Manager Approve
- Page Name: Salary request form
Explanation
Because the Admin role was explicitly assigned as the approver in the permission settings:
- Users with the Admin role can see the request here and take action.
- Users without the Admin role will not see this task in their Inbox and therefore cannot approve or reject it.
This guarantees that approvals are always controlled by the correct group of people, in line with organizational rules.
📌 Tip: Use role-based permissions when approvals should only be managed by a specific level of authority (e.g., Admins, Managers, Finance). This prevents unauthorized approvals and ensures workflow security.
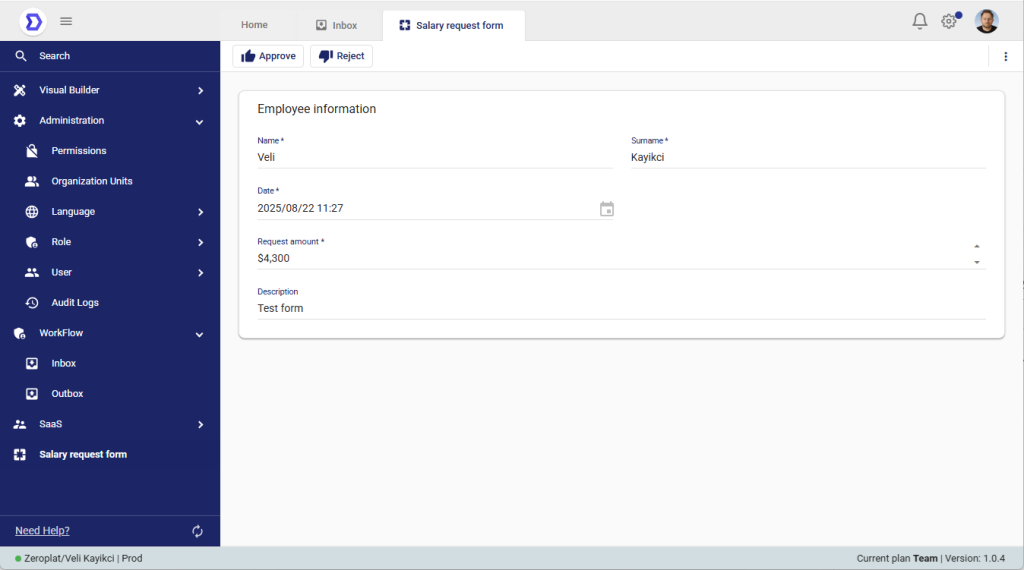
Step: Reviewing and Acting on the Request
After selecting the pending approval task from the Inbox and clicking Open, the system displays the form with all previously entered details. At this stage, the approver (in this case, an Admin) can either approve or reject the request.
What You See in the Image
- Form Data (center):
- Name / Surname → Veli Kayıkcı
- Date → 2025/08/22 11:27
- Request amount → $4,300
- Description → Test form
- Action Buttons (top bar):
- Approve – Confirms and accepts the request.
- Reject – Declines the request.
Explanation
This screen is where the actual decision is made. The approver can carefully review the details submitted in the form before taking action.
The available actions (Approve and Reject) are dynamically shown based on the permissions we configured earlier in the Permissions screen. Since the Admin role was granted approval rights, the Admin user can see both buttons and decide accordingly.
If another user without these permissions opened this task, the action buttons would not be visible to them.
📌 Tip: Always align permissions with organizational policies. For example, only managers may approve financial requests, while admins may have broader access.