
The Inbox is where users can see all workflow tasks that require their action or approval. Each task is listed with essential details so users can quickly review and decide.
Workflows can be assigned for approval on a user, role, or organization unit basis, ensuring that the right individuals or groups are responsible for each step.
Inbox Result List – Field Descriptions
- Date
- Description: The date and time when the workflow task was created and assigned to the user.
- Example: 2025/08/23 13:04.
- Flow Name
- Description: The workflow name to which the task belongs.
- Example: Salary request flow.
- Step Name
- Description: The current step in the workflow that requires the user’s approval or action.
- Example: Manager Approve.
- Page Name
- Description: The form or page associated with the workflow step. When the task is opened, this is the form that will be displayed.
- Example: Salary request form.
- Starter User
- Description: The user who initiated the workflow process.
- Example: Zeroplat.
- End Date
- Description: The date and time when the workflow step was completed.
- If the task is still pending, this field remains empty.
- Example: (empty – task still pending).
- Completed
- Description: Indicates whether the workflow task has been completed.
- Checked ✅ → Task completed.
- Unchecked → Task still awaiting action.
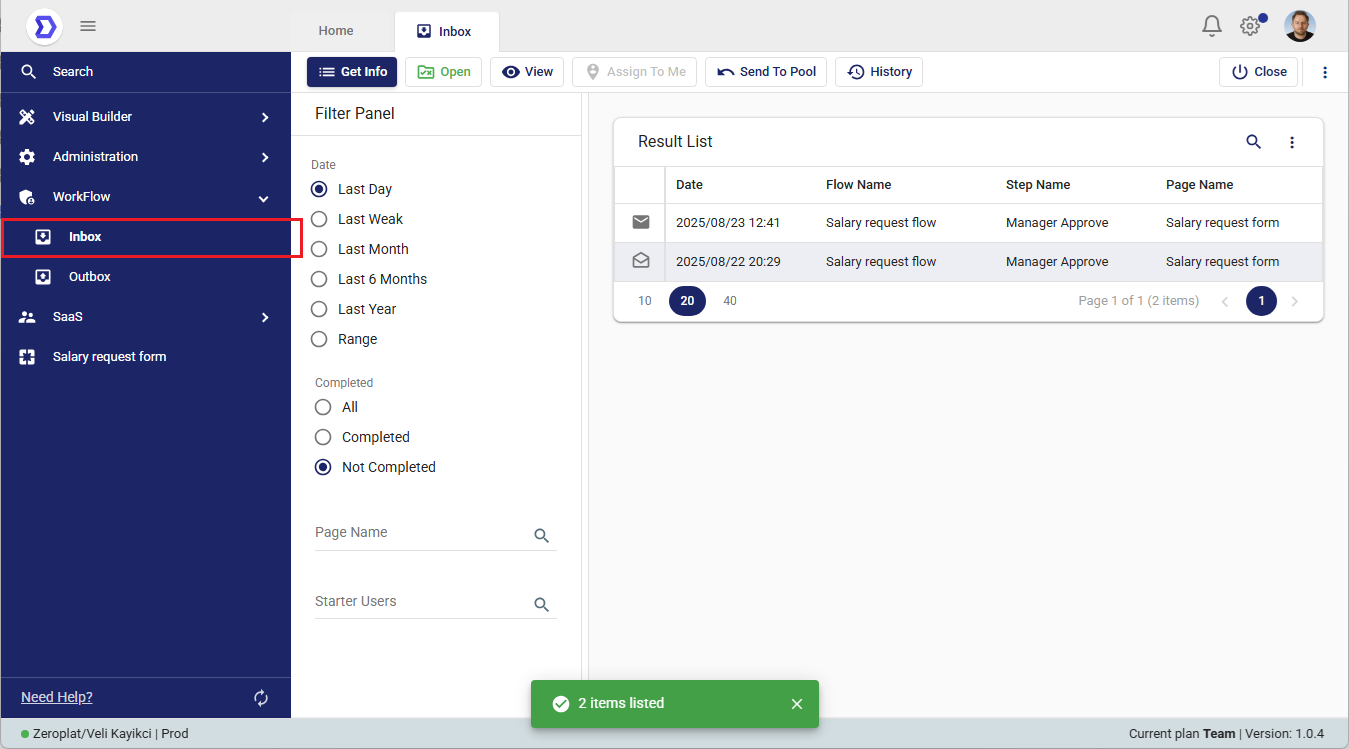
What You See in the Inbox
In the screenshot above:
- Filter Panel (left):
- Date filter is set to Last Day, so only tasks created in the past 24 hours are shown.
- Completion filter is set to Not Completed, so only active tasks awaiting approval are listed.
- Result List (right):
- Two items are displayed, both related to the Salary request flow.
- Each task shows:
- Date – When the task was assigned (e.g., 2025/08/23 12:41).
- Flow Name – The workflow name (Salary request flow).
- Step Name – The current stage requiring approval (Manager Approve).
- Page Name – The related form (Salary request form).
- Top Action Bar:
- Open – Open the selected item to review the form details.
- View – Preview task information.
- Assign to Me – Take ownership of a shared task.
- Send To Pool – Return the task to a shared pool if you cannot process it.
- History – View the workflow history for the selected item.
How to Use the Inbox
- Check for New Tasks
- Navigate to Workflow → Inbox.
- New items are automatically listed based on the filters applied.
- Select a Task
- From the Result List, click on the row of the task you want to review.
- Open the Task
- Use the Open button to display the related form.
- All the fields entered by the requester (e.g., employee info, request amount, description) will be shown.
- Take Action
- Depending on your permissions, you may see Approve and Reject buttons.
- Approve → Confirms and completes the step.
- Reject → Sends the request back or stops the flow based on workflow rules.
- Track Progress
- Use the History button to view previous approvals, rejections, or other actions taken within the workflow.
Example Scenario
In the image:
- Two salary requests are waiting for approval in the Admin user’s Inbox.
- Since the user has the Admin role (as defined in the Permissions screen), they are authorized to approve or reject these requests.
- A non-Admin user would not see these items in their Inbox.
How Workflows Appear in the Inbox
Not every workflow automatically appears in a user’s Inbox.
A workflow item will only drop into a user’s Inbox if they have the necessary permissions for the approval step.
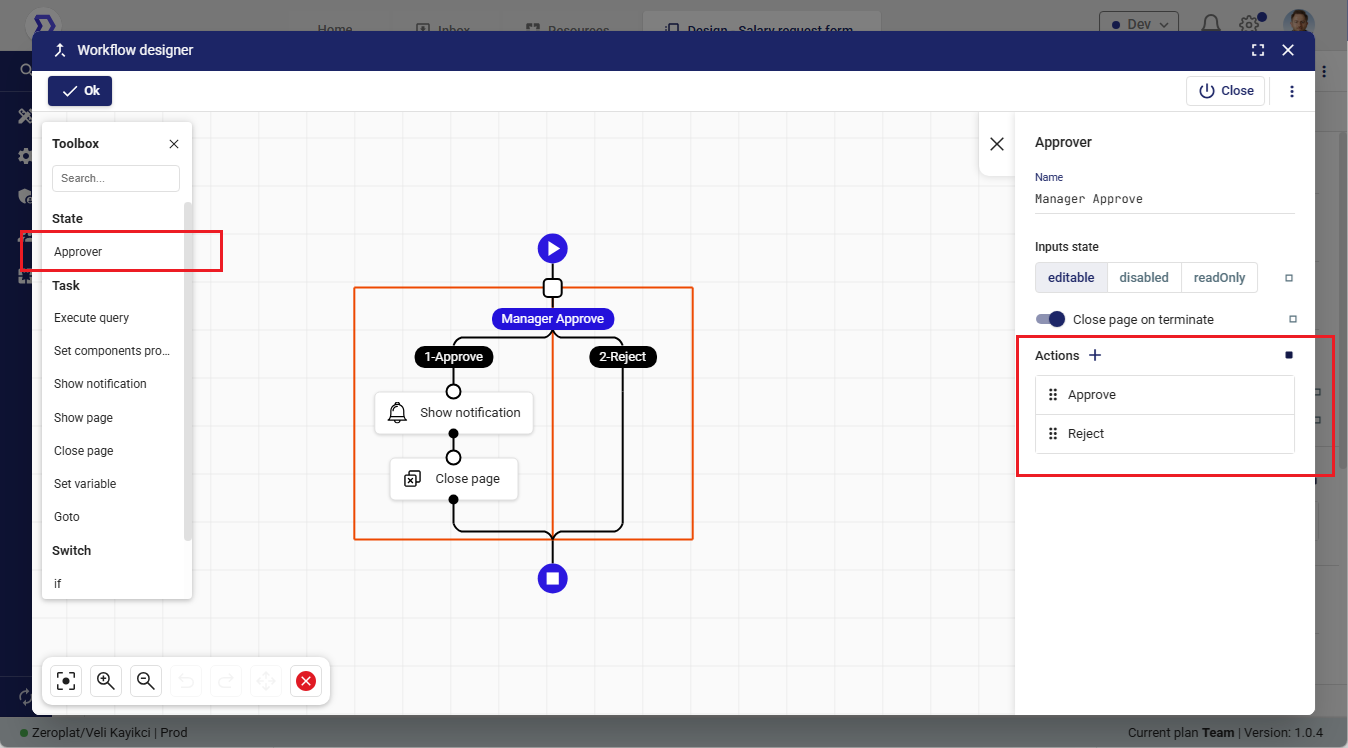
How Permissions Work
- Approver State (Workflow Designer)
- In the Workflow Designer, you add an Approver state (as shown in the image).
- Each Approver state represents a step where one or more users must decide (e.g., Manager Approve).
- In the right-hand panel, you can configure:
- The name of the step (Manager Approve).
- Actions that are available (e.g., Approve, Reject).
- Action-Level Permissions
- These actions (Approve, Reject) are linked with the Permissions screen.
- Only users, roles, or organizational units granted permission for these actions will see the workflow item in their Inbox.
- Example: If the Admin role is assigned to Manager Approve → Approve/Reject, then only Admin users will see and act on the item.
- Inbox Visibility
- If a user has no permission for the Approver step, the request will not appear in their Inbox.
- This ensures strict control: only authorized people can view and handle approvals.
Why This Is Important
- Security: Prevents unauthorized users from viewing or acting on workflow approvals.
- Clarity: Makes sure the right tasks are routed to the right users.
- Flexibility: Allows you to design workflows where different steps are approved by different roles or groups.
📌 Summary:
Inbox visibility is controlled through Approver states in the Workflow Designer. The actions (Approve/Reject) you define here are tied to permissions managed in the Permissions screen.
➡️ Only users with these permissions will see the workflow in their Inbox and be able to act on it.
Linking Workflow Actions to Permissions
When you define actions (such as Approve or Reject) inside an Approver state in the Workflow Designer, these actions automatically appear in the Permissions screen.
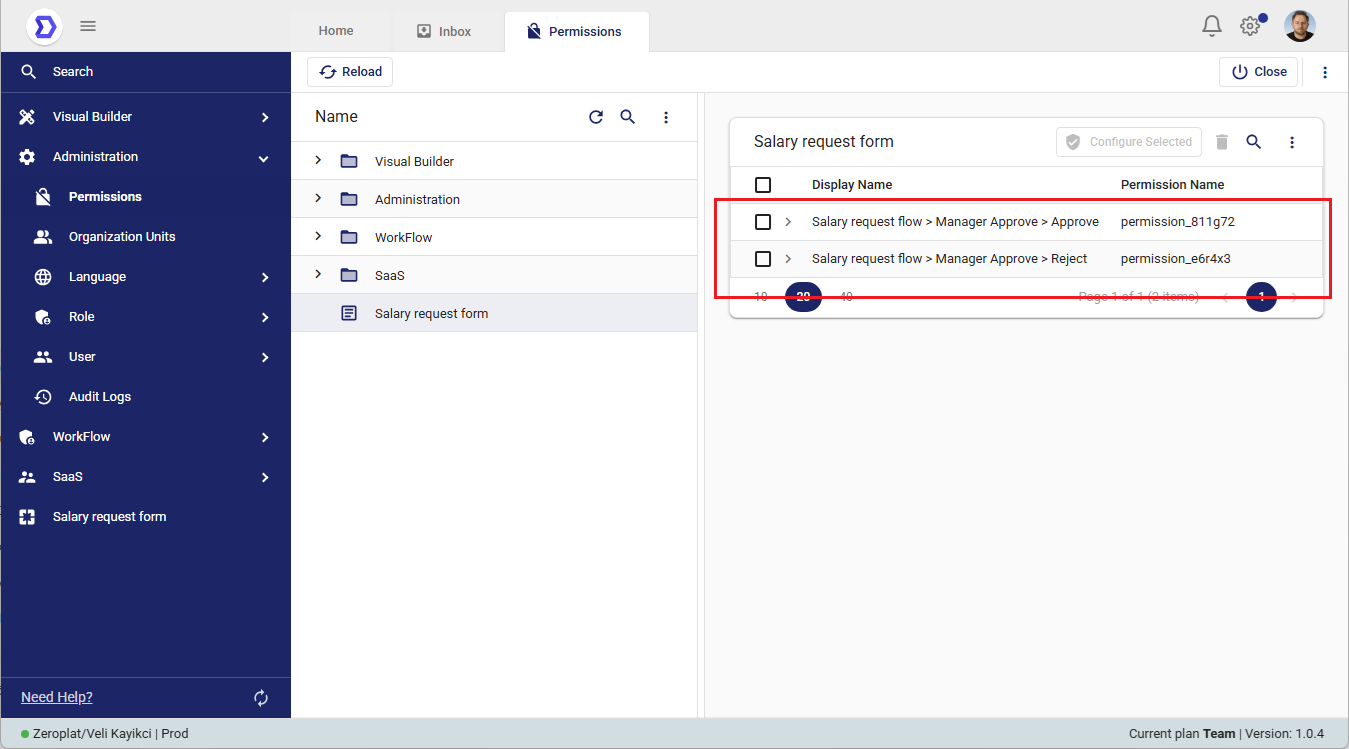
What You See in the Image
- Under the Salary request form, two new permission entries have been created:
- Salary request flow → Manager Approve → Approve
- Salary request flow → Manager Approve → Reject
- Each action defined in the workflow corresponds to a unique permission record (with its own Permission Name).
Explanation
This mechanism ensures that every action in a workflow can be secured and restricted through permissions. For example:
- If a user or role is granted permission for Approve, they will see the Approve button in the approval screen.
- If they do not have this permission, the Approve action will not be visible to them.
- The same logic applies to Reject or any other custom actions you define.
This is why the Permissions screen is tightly connected to the workflow design:
- You define the workflow logic and actions in the Workflow Designer.
- Zeroplat automatically generates corresponding permission entries in the Permissions screen.
- Administrators can then assign these permissions to roles, users, or organization units, ensuring that only authorized people can perform each action.
📌 Key Takeaway:
Inbox visibility and available actions (Approve/Reject) are not random — they are strictly based on permissions. Actions you create in an Approver state are automatically listed in the Permissions screen, where you can assign them to the right people.
Viewing Workflow History
The History view in the Inbox allows users to see the full progress and past actions of a workflow. This is particularly useful for tracking where a request currently stands and understanding who has acted on it so far.
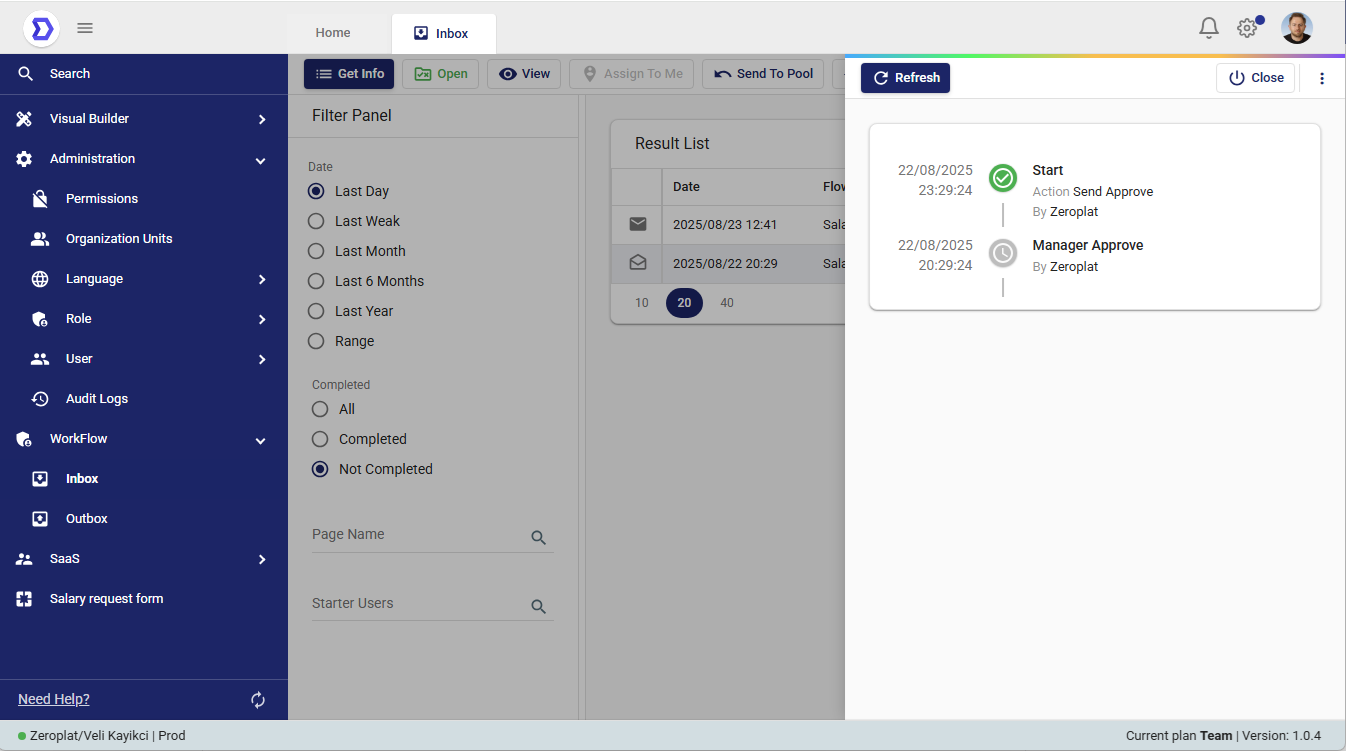
What You See in the Image
- History Panel (right side): Shows the timeline of events for the selected workflow item.
- Entries include:
- Timestamp – Exact date and time when the action occurred (e.g., 22/08/2025 23:29:24).
- Step Name – The workflow stage (e.g., Start, Manager Approve).
- Action Taken – The performed action (e.g., Action Send Approve).
- Performed By – Which system or user executed the action (in this case, Zeroplat).
- Status Icons:
- ✅ Green check mark → Completed successfully.
- ⏳ Clock icon → Step is pending or awaiting approval.
Why History is Useful
- Transparency: Requesters can always check where their request is stuck.
- Accountability: Identifies exactly who is responsible for the next action.
- Traceability: Keeps a timestamped record of all workflow progress.
📌 With the History view, users no longer need to ask “Who is my request waiting for?” — they can see it directly on the screen.
Explanation
From this screen, users gain visibility into the lifecycle of a workflow request. For example:
- The workflow began with the Start step when the user clicked Send Approve.
- It then proceeded to the Manager Approve step, where it is currently waiting for action.
This historical view ensures transparency and accountability. Both the requester and approvers can verify the current status and confirm if the request is moving through the workflow as intended.
📌 Tip: Use the Refresh button to update the workflow history and ensure you are viewing the most recent state.